OpenIPC Downloads & Setup
This page will explain how to setup your OpenIPC hardware to run Ruby. Recommended OpenIPC hardware: cameras that use the Sigmastar SSC338Q SOC, like the Runcam unit, Emax unit, OpenIPC AIO air unit and any future cameras created by manufacturers with the same SOC.
To read more about what OpenIPC is, visit OpenIPC website
OpenIPC hardware requires a different manual setup procedure than other boards, if you are not doing the easy firmware flashing using OpenIPC Companion.
Migrate OpenIPC camera to Ruby firmware:
1
Connect your camera to your home router using an ETH cable;
2
Power up your camera;
There are two ways to proceed: either use the OpenIPC Companion software to flash the Ruby firmware, either do it manually. Follow one of the steps below (steps 3 or steps 4):
3a
If you want to use OpenIPC Companion, download the available OpenIPC Companion from here;
3b
Run the OpenIPC Companion and follow their instructions on how to flash the Ruby firmware on the camera; After all is done, your camera will be running Ruby firmware. That is all.
4a
If you do it manually, follow these steps. First, locate your Ruby firmware here and download it:
https://github.com/OpenIPC/builder/releases
If you are using an OpenIPC Thinker air unit with internal radio card, use the firmware (just copy the URL address): ssc338q_rubyfpv_thinker_internal_wifi-nor.tgz
Otherways use the generic Ruby firmware for all air units with SSC338Q CPU (just copy the URL address): ssc338q_rubyfpv_generic-nor.tgz
4b
Use Putty or any other terminal software on your PC to SSH into the camera (get the IP of the camera from your home router). Default username and password are: root/12345;
4c
Run this command on the camera, replacing first the [URLLINK] text with the link you copied above:
sysupgrade -r -k -n --url=[URLLINK] --force_all
It will download from internet the Ruby firmware and install it on camera. After the process finishes, the camera will reboot automatically. It will now run Ruby firmware on it. Nothing else to do. Skip all the steps below. The update procedure is complete.
If you get an error that it can not download firmare, you can do the firmware update manually:
4d*
Download the archive from the link above, extract the files in the archive and copy the files to the camera, to /tmp folder.
Then run these three commands, one at a time:
- cd /tmp
- soc=$(fw_printenv -n soc)
- sysupgrade --force_ver --wipe_overlay --kernel=/tmp/uImage.${soc} --rootfs=/tmp/rootfs.squashfs.${soc} -z
Full install (IP cameras):
This is for IP cameras that do support OpenIPC firmware but are not yet flashed with OpenIPC firmware or Ruby firmware (usually all IP cameras that one buys from internet).Make sure you have these items ready, before you proceed:
- An OpenIPC air unit or an OpenIPC Sigmastar SSC338Q or SSC30KQ camera or any of the supported IP cameras;
- A PC/Mac; Install a TFPT server on it, like this one; Also install Putty or any other serial terminal software on your PC/Mac;
- A USB-Serial adapter;
- A network cable, to connect your camera to your home router;
Setup Steps:
1
Visit the OpenIPC website where we will download the Ruby software for your hardware: Ruby for OpenIPC AIO / SigmastarSSC338Q;
On that webpage (see the picture below):
- Click to generate a random MAC address for the camera;
- For TFPT server address, type the IP address of your PC/Mac;
- For type and size of camera flash memory: choose NOR 16 Mb for Sigmastar SSC338Q;
- For firmware version choose RubyFPV;
- Leave all other options unchanged and click on Generate Installation Guide;
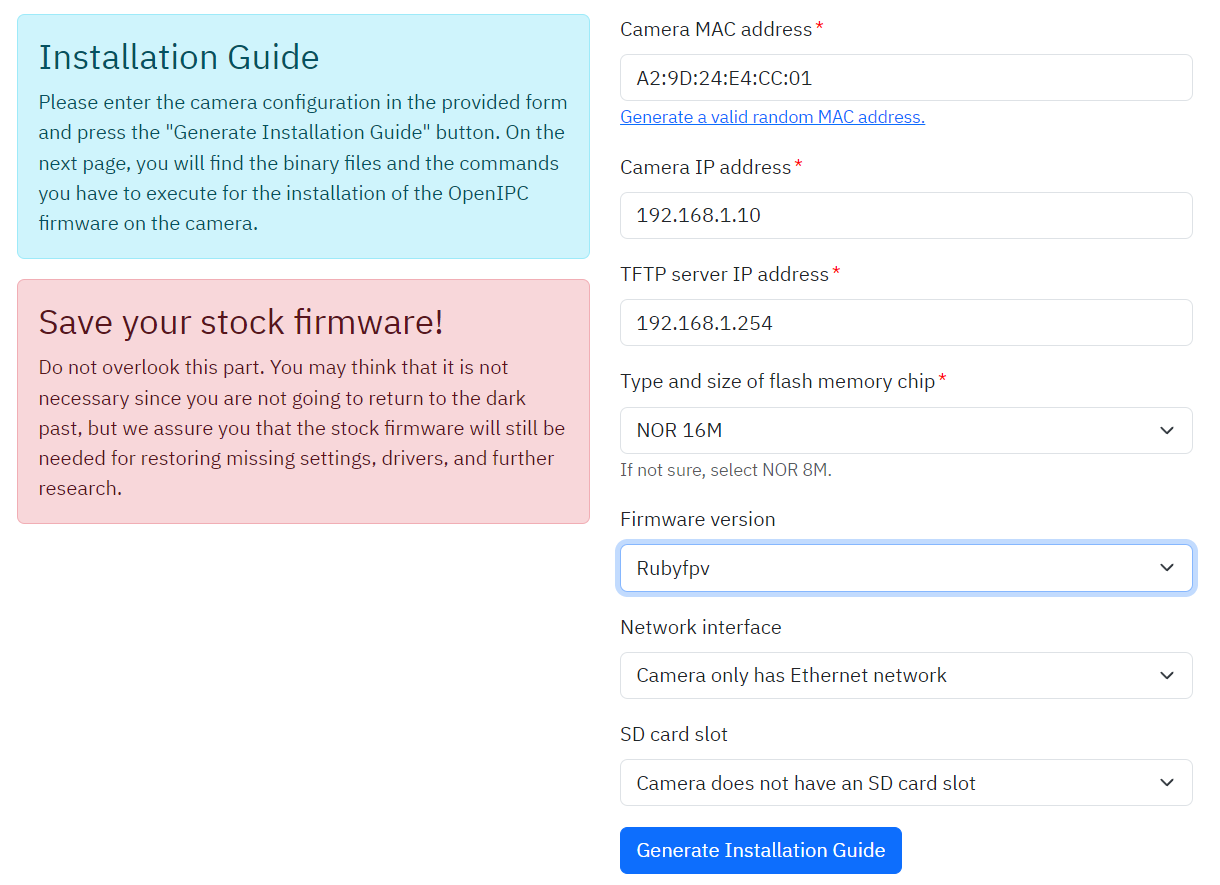
OpenIPC generate firmware options
2
On the page that shows up after you click the button, there are detailed OpenIPC firmware instructions; click on [Download OpenIPC Firmware] on the second card in that page (see picture below);
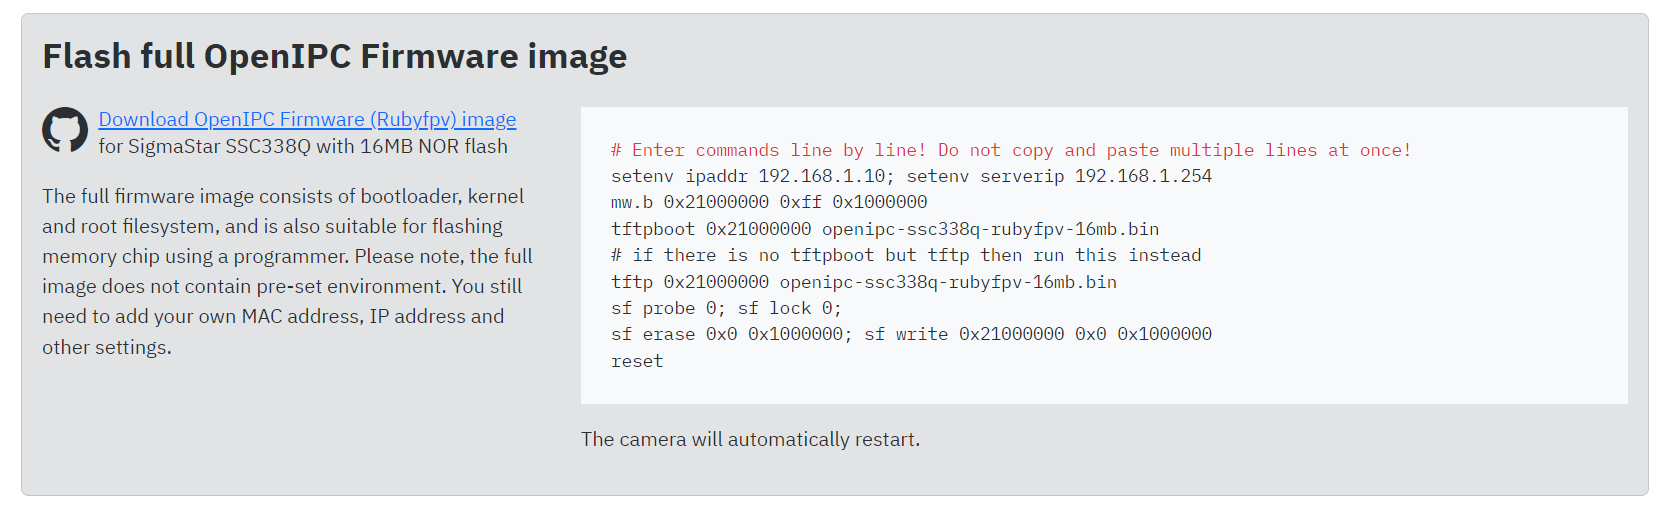
OpenIPC download firmware and install commands
Now you have just downloaded the RubyFPV firmware specific for your OpenIPC hardware;
3
Copy the downloaded firmware on a folder on your PC/Mac and install a TFPT server software. Setup the TFPT server to use the folder you choose as the source for the server files.
4
Connect your camera to your home router using a network cable;
5
Connect your USB-serial adapter to the PC/Mac and to the serial port of the OpenIPC hardware.
Here is the serial port pinout for OpenIPC Sigmastar SSC338Q:
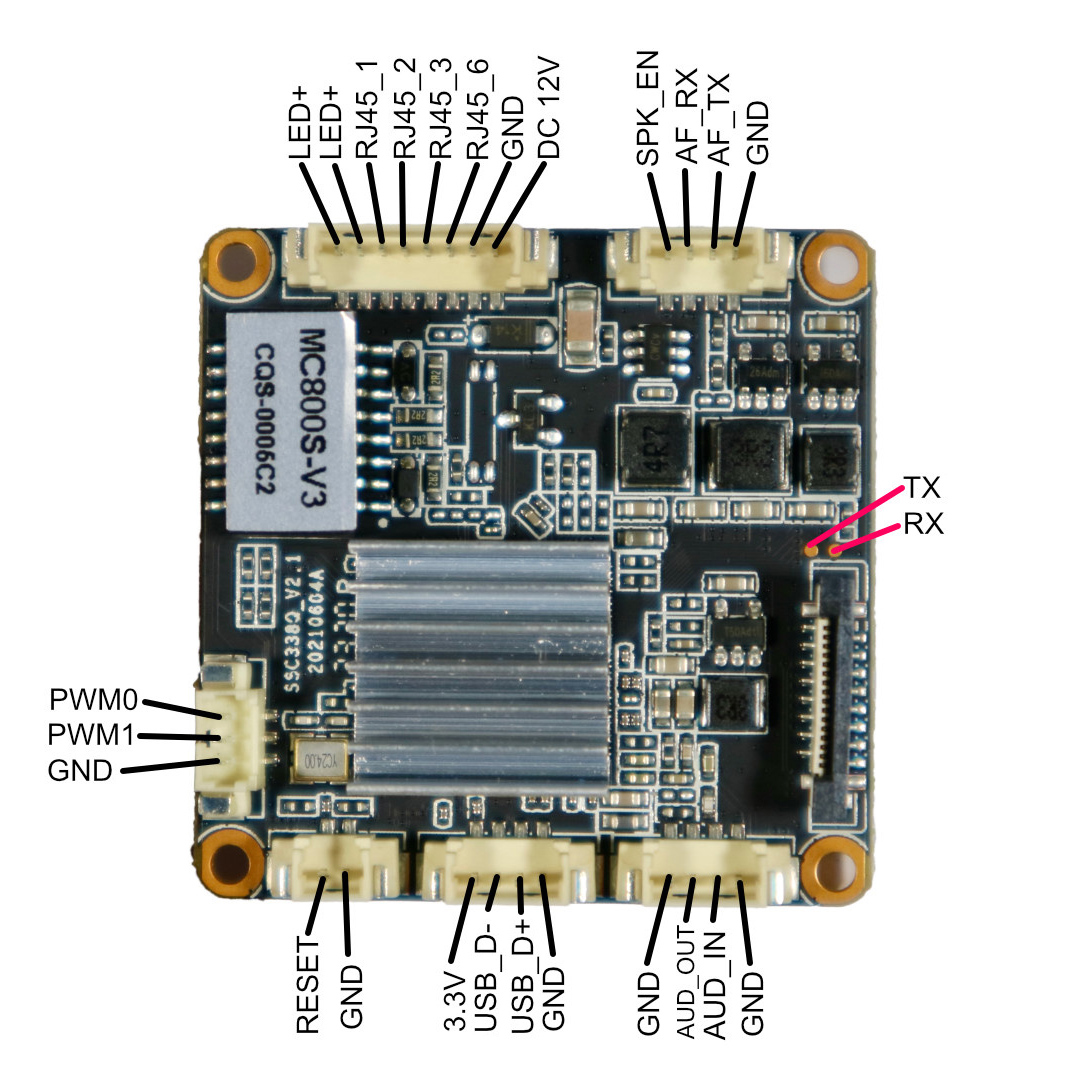
OpenIPC Sigmastar SSC338Q serial port pinout
Note: Remember! As with any UART serial connection, you need to connect the Tx pin on the camera to the Rx pin on the USB-serial adapter and the Rx pin on the camera to the Tx pin on the USB-serial adapter (Tx->Rx, Rx->Tx); And a ground connection too.
6
Start Putty or any other serial terminal on your PC and connect to the USB COM port using 115200 bitrate 8N1 settings;
7
Power up your OpenIPC hardware and when texts starts to show on your PC serial terminal, press [Enter] or [Ctrl]+[C];
As soon as you get a prompt, follow the instructions on the OpenIPC install page you just visited before (where you downloaded the Ruby firmware for OpenIPC);
Note:Enter those flashing commands one by one. Do not copy paste all of them at once!
That's all. After the flashing is complete your OpenIPC hardware will be running Ruby software.
Your OpenIPC hardware should now boot with Ruby and it will automatically start on 5825Mhz frequency. You can use your controller now to search for and connect to the OpenIPC camera/AIO unit and it will be ready to use, with full benefits of Ruby system.
To read more about installation of OpenIPC firmware, as well as seeing alternative flashing methods, check this page: OpenIPC Wiki Installation;
See the OpenIPC FAQ here: OpenIPC FAQ;
Read more info about different OpenIPC topics here: OpenIPC Wiki;